Statue Forum 


Go Back   Statue Forum > Home Grown > From our Bench

Reply
 
Thread Tools
Old 11-02-2013, 08:39 AM   #11
afreeman
Artificial Intelligence usually beats real stupidity.
 
afreeman's Avatar
 
Join Date: Jul 2013
Location: N.C.
Posts: 389
This needs to be stickied when complete!
afreeman is offline   Reply With Quote
Old 11-02-2013, 09:37 AM   #12
EPang
A day without sunshine is like... night.
 
EPang's Avatar
 
Join Date: Sep 2009
Posts: 245
Quote:
Originally Posted by afreeman View Post
Please hurry, must see more!!
I didn't realize how difficult it was trying to document a process. I'm trying to make sure I get more photos taken from this point.

Quote:
Originally Posted by Darth Kinetic View Post
nice! So their is hope to seperate and key my Juggy's arms
I think it took me several sculptures before I felt comfortable enough to start cutting them apart. I always felt I'd be ruining the piece if I did. the beauty of being a figure modeler is that fixing any issues I made in the process should be no problem.

Quote:
Originally Posted by rgm501 View Post
Cool process and cool sculpt, interesting to see how others work.
Thanks. I hope others can correct me or help clarify if I'm not making sense. I'm still learning as well and I gain a lot when I see other artists methods.

Quote:
Originally Posted by growler321 View Post
excellent wip just what i have been looking for cant wait to see more
Thanks. I hope you find it useful.

Quote:
Originally Posted by afreeman View Post
This needs to be stickied when complete!
Well, I wasn't sure if this thread fit in this section or if it would be better in the pitstop. It might be more fitting in the latter.
EPang is offline   Reply With Quote
Old 11-02-2013, 05:39 PM   #13
GedTasker
Home Grown Mod
Moderator
 
GedTasker's Avatar
 
Join Date: Sep 2011
Location: Liverpool uk .
Posts: 1,580
Is right EPang, good to see you again mate. That Wolverine looks fantastic!!!

Yeah this has to be made sticky it's the best sculpting tutorial I've seen in a long time!!

* Right I made it sticky

Last edited by GedTasker; 11-04-2013 at 08:05 PM.
GedTasker is offline   Reply With Quote
Old 11-02-2013, 05:45 PM   #14
Alex655321
Yeah, I spend WAY too much time here!
 
Alex655321's Avatar
 
Join Date: May 2005
Location: LI New York
Posts: 143,157
Really dig the step by step process pics !
Alex655321 is offline   Reply With Quote
Old 11-02-2013, 07:22 PM   #15
halfamazing
Before you criticize someone, you should walk a mile in their shoes. That way, when you criticize them, you're a mile away and you have their shoes.
 
halfamazing's Avatar
 
Join Date: Jun 2013
Location: 192.168.1.1
Posts: 624
Thanks for this tutorial Epang.

Could you please go into more detail about the transition between these two pics?


like what equpment you use to hold up the sculpt...

Thanks
halfamazing is offline   Reply With Quote
Old 11-02-2013, 09:27 PM   #16
EPang
A day without sunshine is like... night.
 
EPang's Avatar
 
Join Date: Sep 2009
Posts: 245
Quote:
Originally Posted by GedTasker View Post
Is right EPang, good to see you again mate. That Wolverine looks fantastic!!!

Yeah this has to be made sticky it's best sculpting tutorial I've seen in a long time!!

* Right I made it sticky
Awesome! Thanks brotha, much appreciated.


Quote:
Originally Posted by Alex655321 View Post
Really dig the step by step process pics !
Glad to hear. I also enjoy seeing how everyone else works. There have been times where i've found better solutions to my methods from others.

Quote:
Originally Posted by halfamazing View Post
Thanks for this tutorial Epang.

Could you please go into more detail about the transition between these two pics?
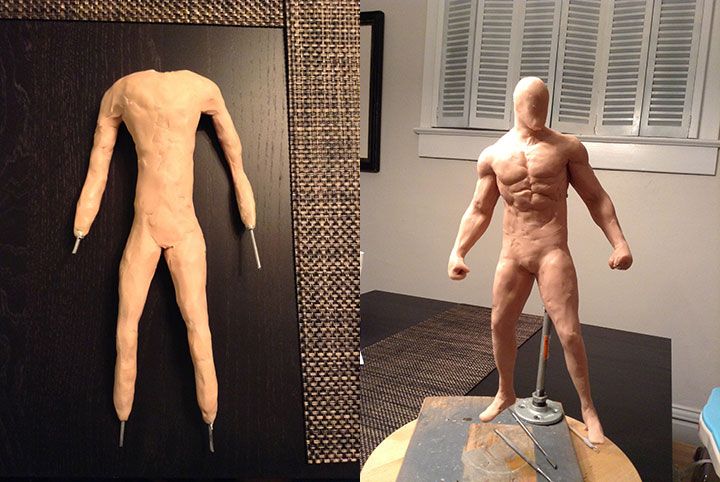


like what equpment you use to hold up the sculpt...

Thanks
No problem. I did sort of gloss over that mainly because there are so many ways to go about creating an Armature Support. There are some really intricate ways of building them, but I've always been a proponent of "Simpler is better". I'll give a quick run down of my Support tree, but i encourage you to google some other ways because there are better methods than what i use.
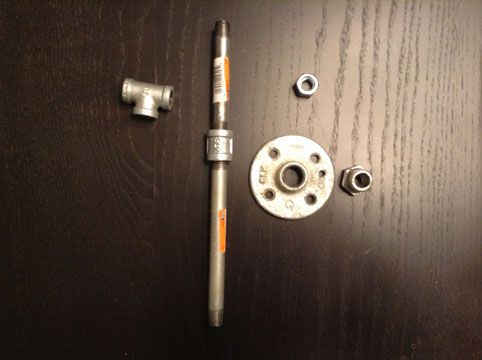

The support tree for my Armatures consist of basic galvanized steel plumbing you can get from most hardware stores. I got my materials from Menards.
• 1/2" base flange
• 1/2" to 1/4" galvanized bushing
• Assorted lengths of 1/4" pipe
• Assorted 1/4" couplings (straight, T, corner, etc)
• The photo shows a 1/4" threaded bolt, but it can also be swapped out with a 1/4" galvanized cap
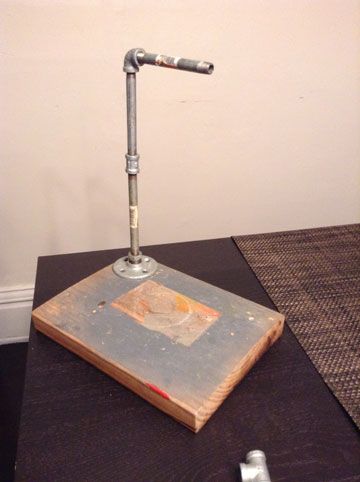

The support tree basically gets assembled together as shown in the above photo. Base flange screws into random wood board. 1/2to1/4" galv bushing threads into flange. 1/4" pipe threads into bushing (mix/matched to fit desired height). Topped with either 90 deg coupling or t-coupling with additional desired 1/4" pipe threaded in other end. If you reference my armature photos, you'll notice the middle of the armature body (around ribcage area) has some epoxy putty attached to it. On the backside it has a 1/4" coupling cap stuck to it. That is where the support tree threads into. That's basically it.
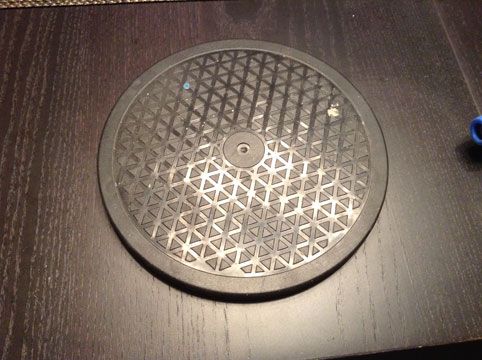
I place a cheap Lazy Susan underneath the wooden base of the Support tree to make it easier to spin 360 deg. Hope this helps.

E
EPang is offline   Reply With Quote
Old 11-04-2013, 12:52 AM   #17
halfamazing
Before you criticize someone, you should walk a mile in their shoes. That way, when you criticize them, you're a mile away and you have their shoes.
 
halfamazing's Avatar
 
Join Date: Jun 2013
Location: 192.168.1.1
Posts: 624
Thanks mate, very detailed and very helpful.
halfamazing is offline   Reply With Quote
Old 11-04-2013, 09:38 AM   #18
DynamicMenace
Yeah, I spend WAY too much time here!
 
DynamicMenace's Avatar
 
Join Date: Jul 2011
Posts: 17,059
pretty killer Epang. cool wolvie too.
DynamicMenace is offline   Reply With Quote
Old 11-04-2013, 09:29 PM   #19
BarbarianFan
Before you criticize someone, you should walk a mile in their shoes. That way, when you criticize them, you're a mile away and you have their shoes.
 
BarbarianFan's Avatar
 
Join Date: Mar 2009
Posts: 623
I really like to see how others sculptors work, it's always so instructive !
Thanx EPang for that great tuto.
BarbarianFan is offline   Reply With Quote
Old 11-05-2013, 06:18 AM   #20
Darkeye
Artificial Intelligence usually beats real stupidity.
 
Darkeye's Avatar
 
Join Date: Jan 2012
Location: i live in a small village near Aylesbury in Buclinghamshire, UK
Posts: 395
thanks for this; I also love seeing how others lay up a sculpt. Looking forward to more...

atb --tim
Darkeye is offline   Reply With Quote
Reply

Thread Tools

Posting Rules
You may not post new threads
You may not post replies
You may not post attachments
You may not edit your posts

BB code is On
Smilies are On
[IMG] code is On
HTML code is Off

Forum Jump

Powered by vBadvanced CMPS

All times are GMT -4. The time now is 10:14 PM.


Powered by vBulletin®
Copyright ©2000 - 2024, Jelsoft Enterprises Ltd.
Copyright StatueForum.com