Statue Forum 


Go Back   Statue Forum > Home Grown > From our Bench

Reply
 
Thread Tools
Old 02-28-2014, 06:44 PM   #41
EPang
A day without sunshine is like... night.
 
EPang's Avatar
 
Join Date: Sep 2009
Posts: 245
HEAD

Sculpting faces and heads takes some practice and patience. I approach a head sculpt similar to how an illustrator would a face drawing.
• I start with an oval type shape
• use the sharp end of a tool to mark a center, eye, nose, and mouth line
• i then begin to add in little balls/snakes of clay to the head to build out facial structures
I have print outs of the body patterns and head patterns that martin canale was so gracious to post in the Sculptor's pit stop area http://www.statueforum.com/showthread.php?t=25103.

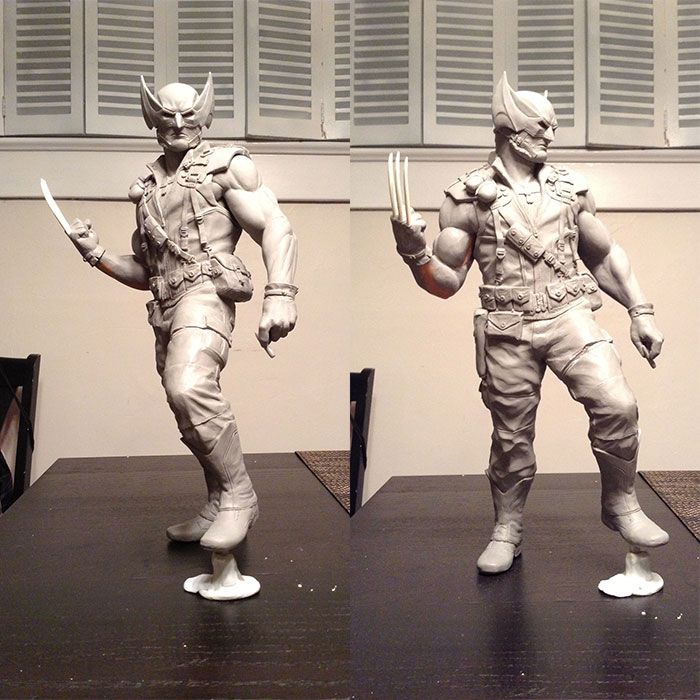
These next few steps happen after i have a roughed in head i created in the "blocking in" stage earlier in my process.
• I take my roughed in head and remove the blocked in place holder mask
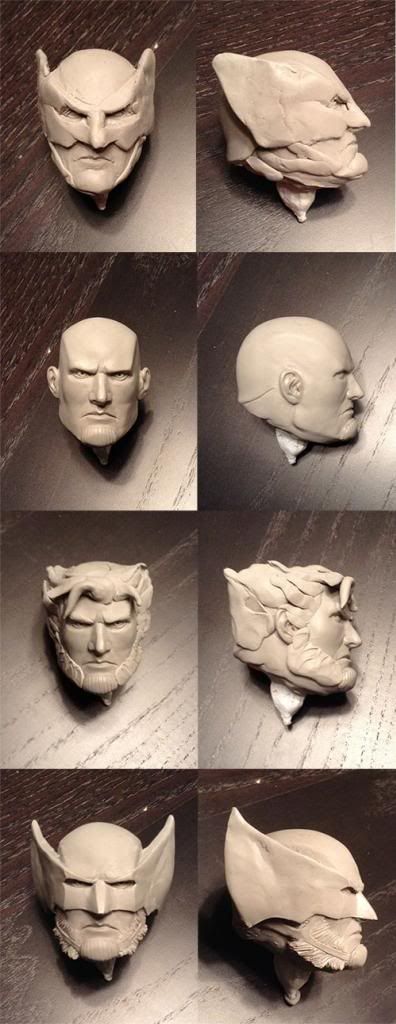
• using reference material, i try and create as symmetrical a face as possible
• Using a mirror to view the face helps to point out any inconsistencies in my work
• I create a blank face and head before adding in any additional features (i.e. hair and/or mask) *I took photos after i started to mock in the chin strap, ooops
• If i were going to create multiple heads as an option, i would make a quick waste mold of this blank head and cast in wax, then add on hair etc.
• I chose to quickly mock in what it might look like if i had an alternate head with hair
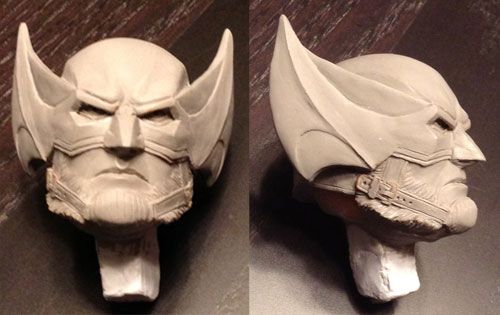
• After the blank head is baked I went in and rough in what the mask will pretty much look like
• I'll still be making tweaks and changes to the mask and facial hair, but i find it good to go with a design and place it back on the sculpture to see if it works
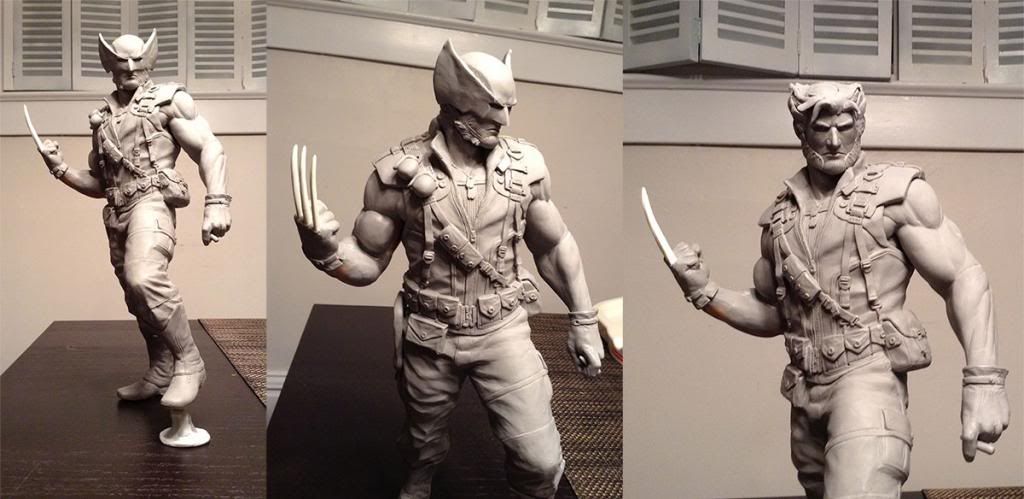
• I then take some photos of the full figure and take notes of adjustments i might need to make (i.e. if the head is too big, if the mask shape isnt quite right, if the angle of the head is off, etc..)
• i'll take a day off from looking at it and come back to it with fresh eyes to make sure i didnt miss anything
(This is where i'm at right now in the process)
• I'll then make any changes to the head i have and clean up my detail work
• After i smooth out my work with turpenoid and bake it, I'll go back and fix my quick keying job i did with the head and neck (i'll try and show that process in my next post)


EPang is offline   Reply With Quote
Old 02-28-2014, 09:51 PM   #42
jollyskeleton
Kiss my shiny metal arse!
 
jollyskeleton's Avatar
 
Join Date: Apr 2008
Posts: 4,105
Cool stuff! Thanks for sharing!
jollyskeleton is offline   Reply With Quote
Old 02-28-2014, 10:15 PM   #43
attom44
Frackin!
 
Join Date: Aug 2010
Posts: 48
Thank you for posting your procedure.. appreciate your hard work!
attom44 is offline   Reply With Quote
Old 02-28-2014, 10:56 PM   #44
Sithlord32
New Republic
 
Sithlord32's Avatar
 
Join Date: Dec 2013
Location: Land of 10,000 Lakes
Posts: 2,419
Bookmarked and subscribed.
Sithlord32 is offline   Reply With Quote
Old 03-01-2014, 05:11 AM   #45
lucio
42.7 percent of all statistics are made up on the spot.
 
lucio's Avatar
 
Join Date: Nov 2010
Location: Italy,Soliera,(Modena)
Posts: 186
Grazie!
lucio is offline   Reply With Quote
Old 03-01-2014, 07:52 AM   #46
aliseo85
42.7 percent of all statistics are made up on the spot.
 
aliseo85's Avatar
 
Join Date: Nov 2012
Posts: 163
Love you!
aliseo85 is offline   Reply With Quote
Old 03-21-2014, 06:32 PM   #47
EPang
A day without sunshine is like... night.
 
EPang's Avatar
 
Join Date: Sep 2009
Posts: 245
Thanks for the comments!

HEAD UPDATE

Here's an update of the mask:


KEYING PART 2

Here is a more in-depth description of my keying process. Im sure there are better/easier ways to go about it, but this is what works for me.

Tools:
• Hand Scroll saw
• Rubber band
• Epoxy Putty
• Vaseline
• Dremmel Tool

1. When i pick an area that im going to be cutting apart for the keying process i try and find a logical place where the seam will be hidden. I've chosen to separate the leg at the thigh where the leg strap is located.
2. I use my hand scroll saw to cut the leg at the desired location.
3. The newly separated pieces
4. I use a dremmel tool to carve away the inside of the thigh AND leg portion.
5. The Super sculpy can sometimes get cracks and/or get crumbly so i reinforce the newly carved cavity with a thin layer of epoxy.
6. After the epoxy cures, i want to create a unique shape (key) to make sure the other half locks into place correctly. If i were to use the round shape in step 5, then there is a high possibility that the two halves wouldnt line up properly. I've added a little more epoxy putty and cut some 90degree corners to get a shape i'm happy with. In the past i've used a square dowel rod to depress a nice clean Square shape into the epoxy, but i didn't have one laying around. You can find square dowel rods at hobby stores and they range in sizes 1/4"-1".
7. After the top half is fully cured, i coat the entire cavity with vaseline. I also make sure to coat the rim as well as the outside for safe measure. I then take the bottom portion of the leg and apply enough epoxy putty to reinforce the the area i carved away as well as to fill the upper cavity to form the "key". I then carefully smush the two halves together and align the leg as close as possible to its original position. If any epoxy squeezes out of the seam I use my exacto blade to cut away the excess. once i get the two halves together to my liking, i use a rubber band to hold everything nicely in place.
8. After the other half cures, gently separate the two halves. The vaseline should allow for easy separation, but sometimes you still need to apply a little bit of force to get them apart.


Lastly i put things back together to double check that it is all still looking good. I will then go back and clean up the seam and any other areas that got ruined during the separation process. I will repeat this process with the other leg as well.


Thanks for looking.

E
EPang is offline   Reply With Quote
Old 03-21-2014, 07:56 PM   #48
Velayos
I took an IQ test and the results were negative.
 
Join Date: Feb 2014
Location: Murcia, Spain
Posts: 57
amanzing job! congrats!! and thank you for the super detailed tutorial!
Velayos is offline   Reply With Quote
Old 03-21-2014, 08:05 PM   #49
DynamicMenace
Yeah, I spend WAY too much time here!
 
DynamicMenace's Avatar
 
Join Date: Jul 2011
Posts: 17,059
thats one cool military lookin wolvie you have there E.
kick ass man.
is the mask inspired by the mask shown at the end of "The Wolverine" film?
DynamicMenace is offline   Reply With Quote
Old 03-21-2014, 09:26 PM   #50
EPang
A day without sunshine is like... night.
 
EPang's Avatar
 
Join Date: Sep 2009
Posts: 245
Quote:
Originally Posted by Velayos View Post
amanzing job! congrats!! and thank you for the super detailed tutorial!
Thanks and no problem!


Quote:
Originally Posted by DynamicMenace View Post
thats one cool military lookin wolvie you have there E.
kick ass man.
is the mask inspired by the mask shown at the end of "The Wolverine" film?
Yeah totally. After I watched the alternate ending and saw that great half helmet, I thought "what a missed opportunity for a cool costume design". I ended up watching captain america:TFA shortly after that and was inspired to create a ww2 wolverine that could exist in the same world. I figured the helmet was similar to captain america in style so why not make the rest. As you can tell, my wolverine's out fit is heavily influenced by captain America's rescue outfit from the movie. I've always been a huge fan of the brown&tan wolvie outfit and thought saw a way to make it work with a brown leather coat (or vest) and khaki paratrooper pants. I liked the idea of making the boot dust covers retain elements of the winged boot tips, but would look more like cowboy boots. All the extra pouches and straps were great practice in sculpting and it adds a cool visual element that is still practical for ww2. Anyway, I also used a lot of simone bianchi wolverine designs for mask reference.

E
EPang is offline   Reply With Quote
Reply

Thread Tools

Posting Rules
You may not post new threads
You may not post replies
You may not post attachments
You may not edit your posts

BB code is On
Smilies are On
[IMG] code is On
HTML code is Off

Forum Jump

Powered by vBadvanced CMPS

All times are GMT -4. The time now is 03:14 PM.


Powered by vBulletin®
Copyright ©2000 - 2024, Jelsoft Enterprises Ltd.
Copyright StatueForum.com