
|
 |
|
 |
 |
|
 08-22-2016, 01:25 PM
|
#1
|
|
Frackin!
Join Date: Jun 2016
Posts: 41
|
My ultimate Ikea Pax built, with Acrylic doors !
For the past couple of months I have been planning to get some display cabinets for my statues, we had an empty wall in the Azores house that is about 3.2 meters long and 2.4 meter high up to the light recess (the overall ceiling being about 2.6 meter).
I started by looking into the usual places like Ikea, and also listening to the advise and experience of many others in the Statue collector forums, seemed the most common preferred cabinet was the Ikea Besta system, but I had a problem, it was only 40cm deep, and I intended to put glass or acrylic doors on it, as such my Prime 1 Ninja Turtles would not fit !, nor would my Deadpool Kills Marvel throne.
The only solution I found was to o with the Ikea PAX system, it was 60cm deep and they had it on 236cm height, it seemed perfect, I just had to decide between 4 x 75cm wide cabinets or 3 x 1m wide, and also the colour, I wanted it either black or white, in the end I decided to go for white as black would have clashed too much with the rest of the surroundings, the house is very light and bright, the black would have stood out too much.
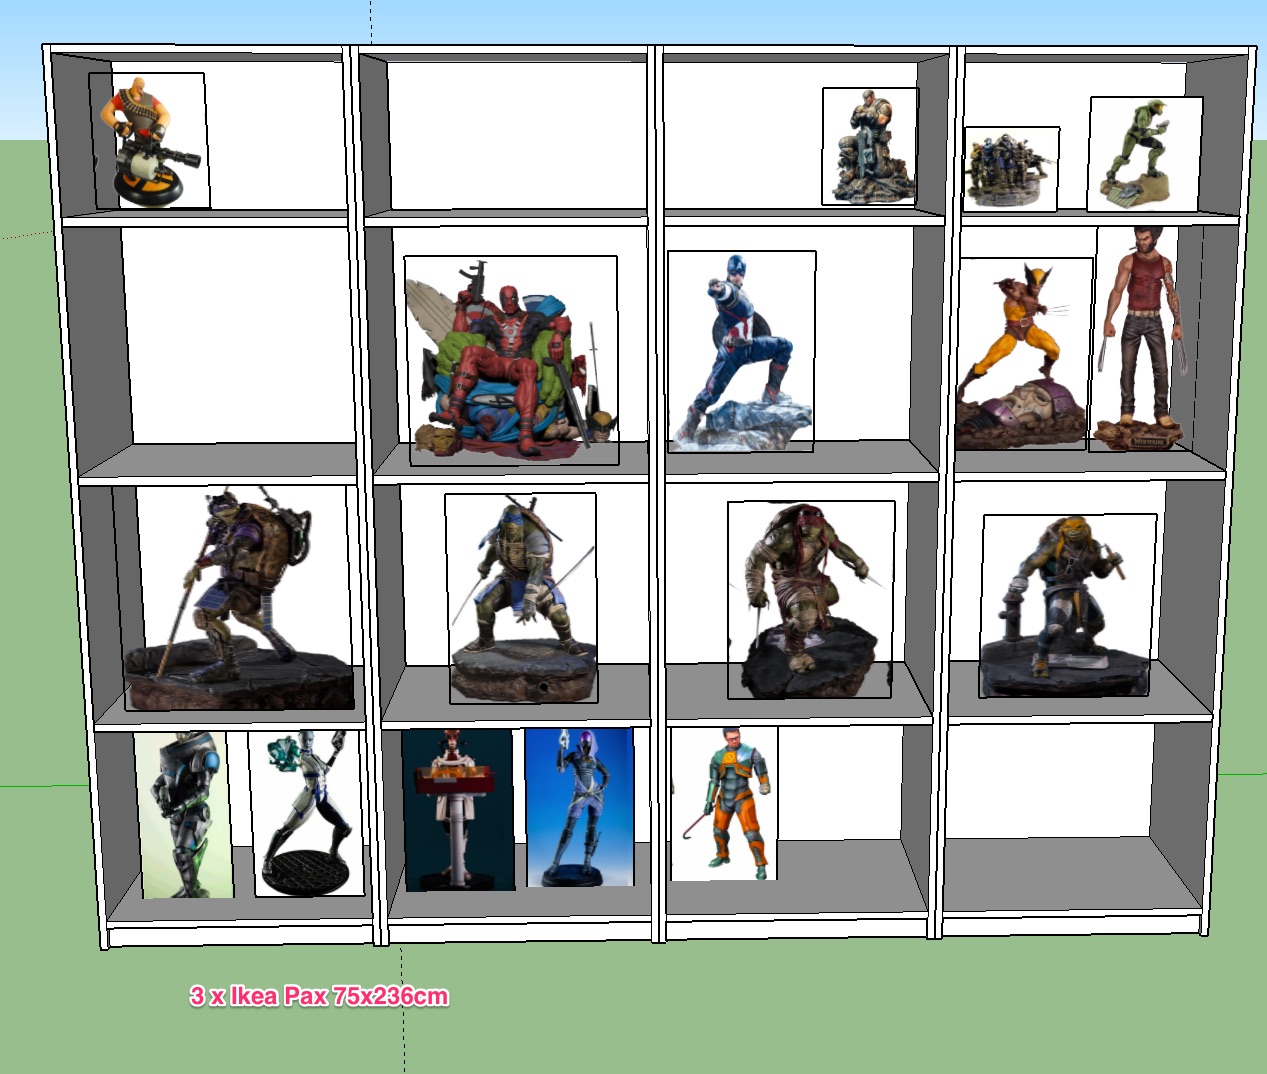
I then proceeded to mockup on Sketchup the two options, also added some of my larger statues to ensure it would fit and to plan how many sections I could realistically get
The 4 x 75cm option:
And the 3 x 1m option:
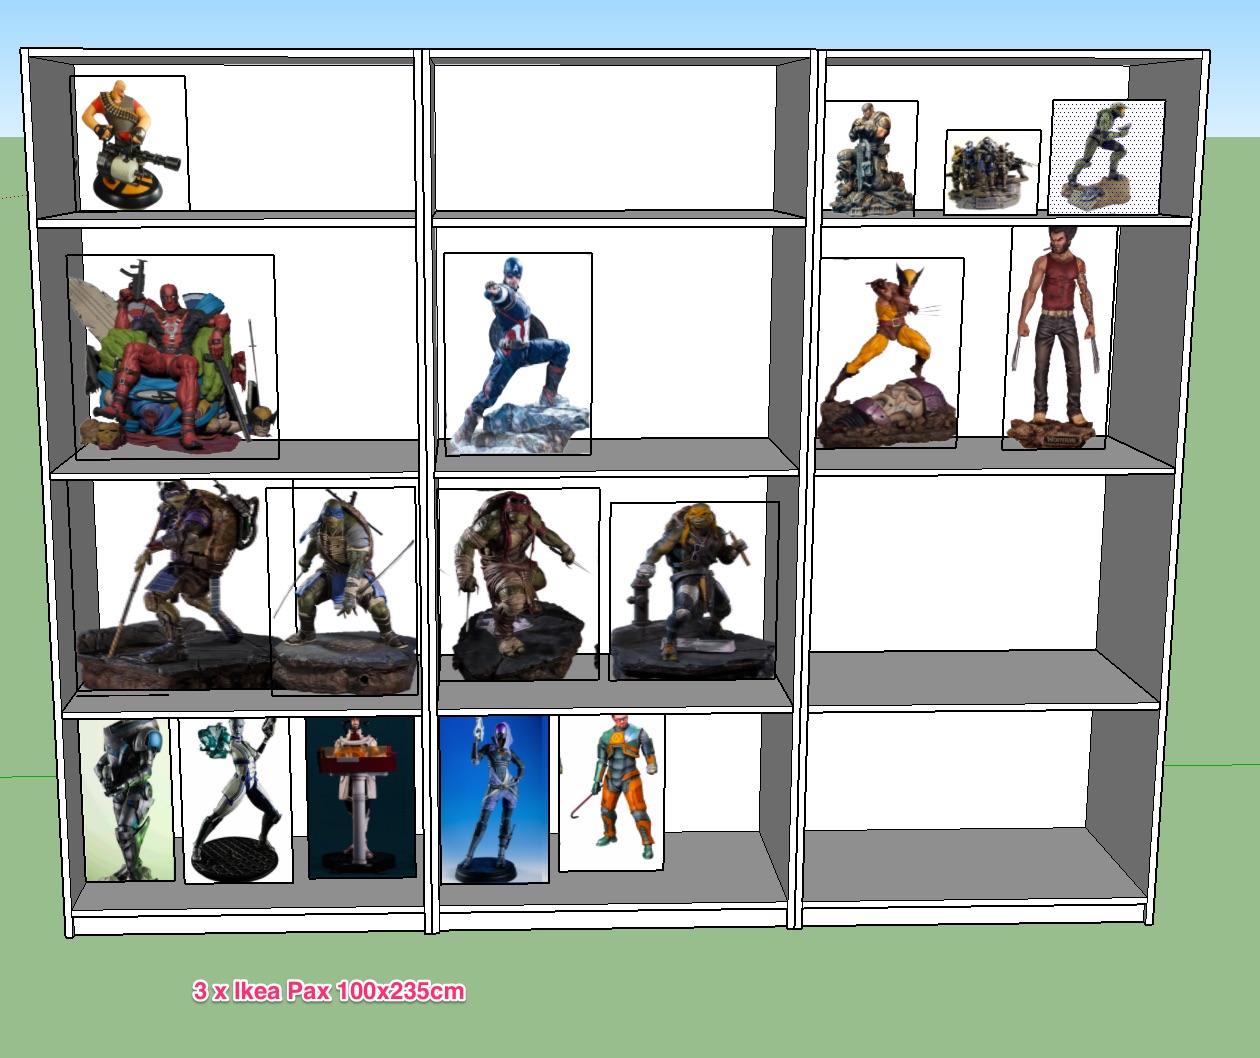
I decided to go for the 1m wide option, seemed I could get more statues in there by combining the four turtles into two sections, problem was, with the 75cm wide I had the option to buy the sliding doors that Ikea sells and replacing the panels with acrylic, with the 1m one I did not, as you need a pair of cabinets per door setup, works for 2 or 4, but not for 3.
But I was also not that excited about using the Ikea frames, they have a thick frame, and I was afraid it would take away too much of the view from the statues, I really wanted to get glass or acrylic doors with no frame, but that proved easier said that done, as there are NO such options for these cabinets, so I had to make them custom.
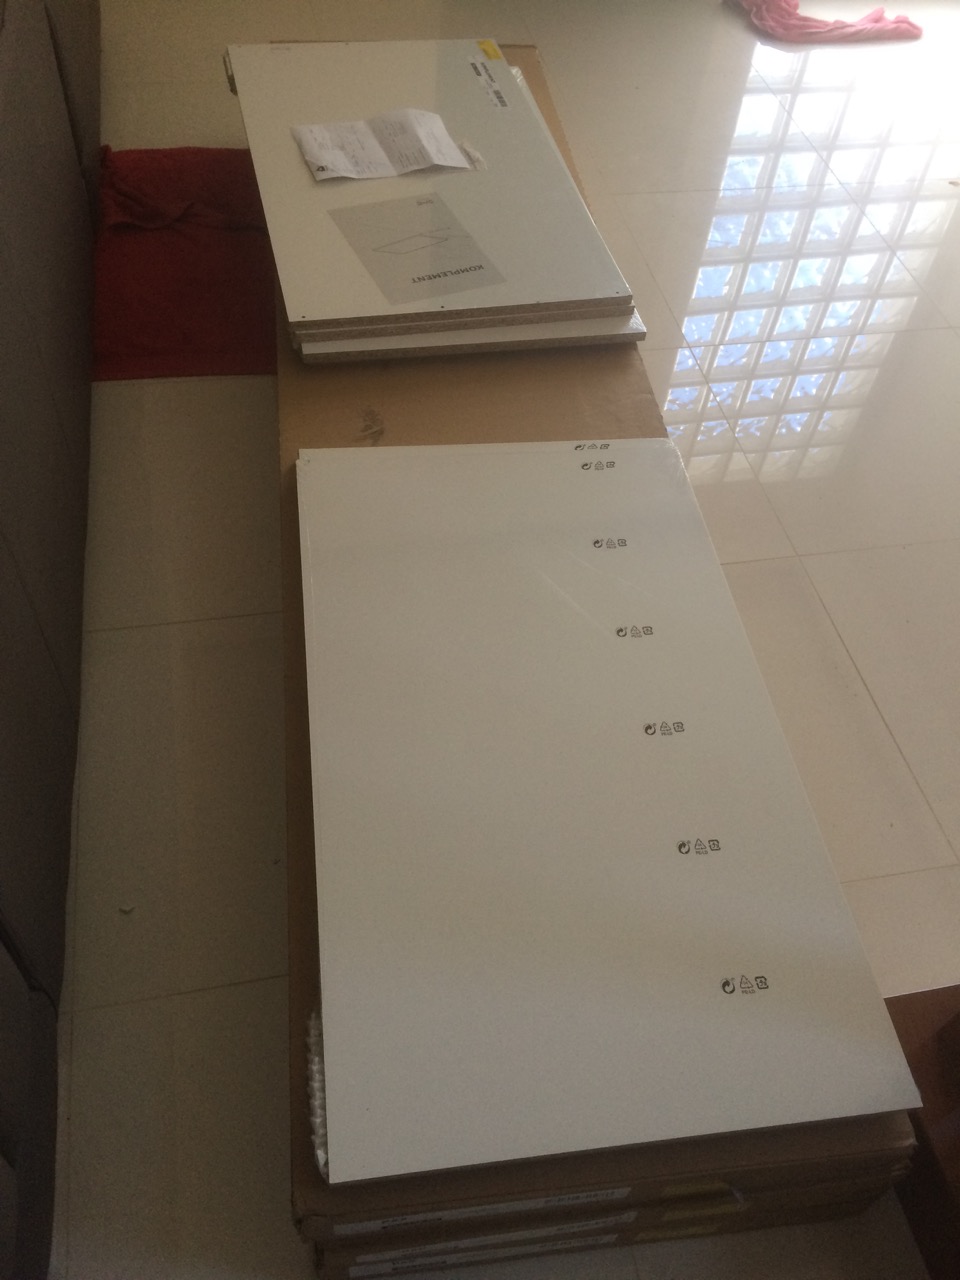
So I ordered the cabinets from Ikea Portugal and they were delivered to the Azores within a few weeks, I arrived there on Saturday night (actually Sunday at 1:30 AM) and by 9AM I was building them 
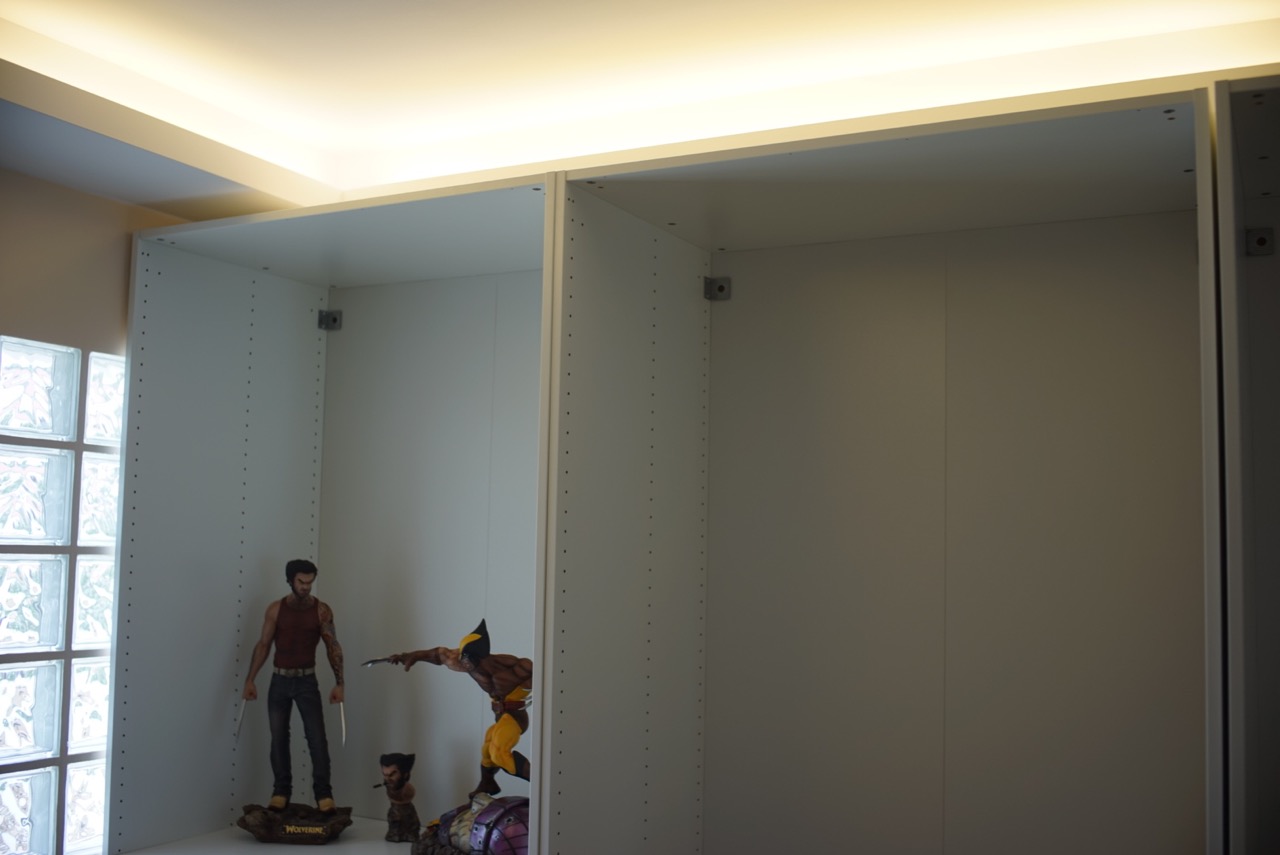
Here we are mid way trough the build up, could not contain my excitement so I had to see how a couple of statues looked on it
As I did not trust the plastic shelf pegs-that Ikea ships with these, I was able to find on Amazon some stronger ones from Hafele (model-SKI6730), they are rated to support up to 150kg for a set of 4, so bought a few bags of them and installed them instead, highly recommend using these ones, they have no comparison to the Ikea pegs !
Here they are installed in place:
Next came the matter of reinforcing the bottom two shelves, the turtles alone are over 10kg each, put two of them in a 1m wide (well, 96.3cm) shelf, and it is sure to start bowing in no time, leading to it eventually breaking, so I knew I needed something to make it stronger.
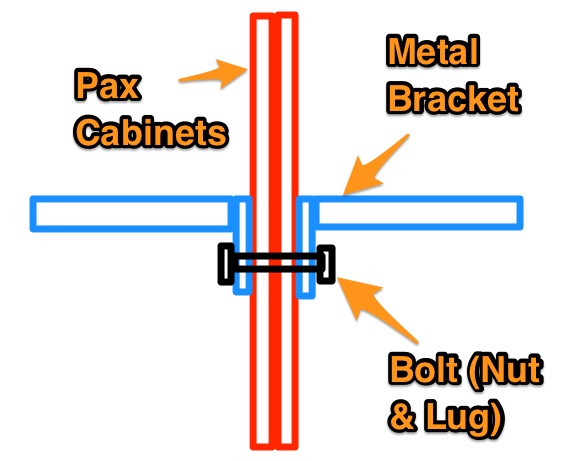
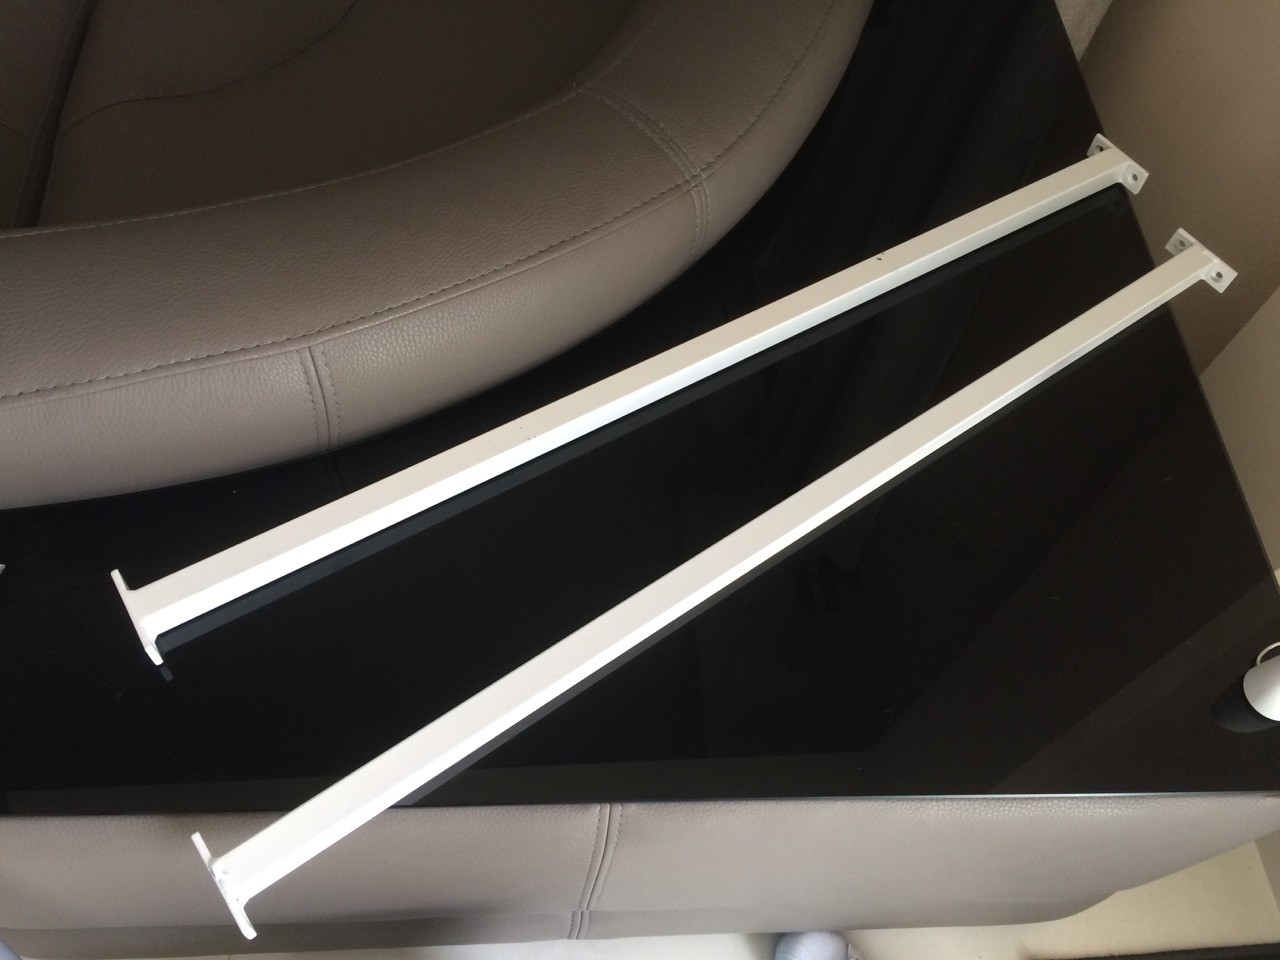
I once again researched everywhere for a solution, but came to no proper examples that people had done that pleased me, so I decided to come up with my own idea, each shelf would have under it a 96.3cm long steel bar, 2.5cm by 2.5cm with welded in brackets to attach to the cabinet.
To make it even stronger, I decided to drill between the cabinets, so the bracket of a cabinet would be bolted to the bracket on the cabinet on the side.
(quick sketch)
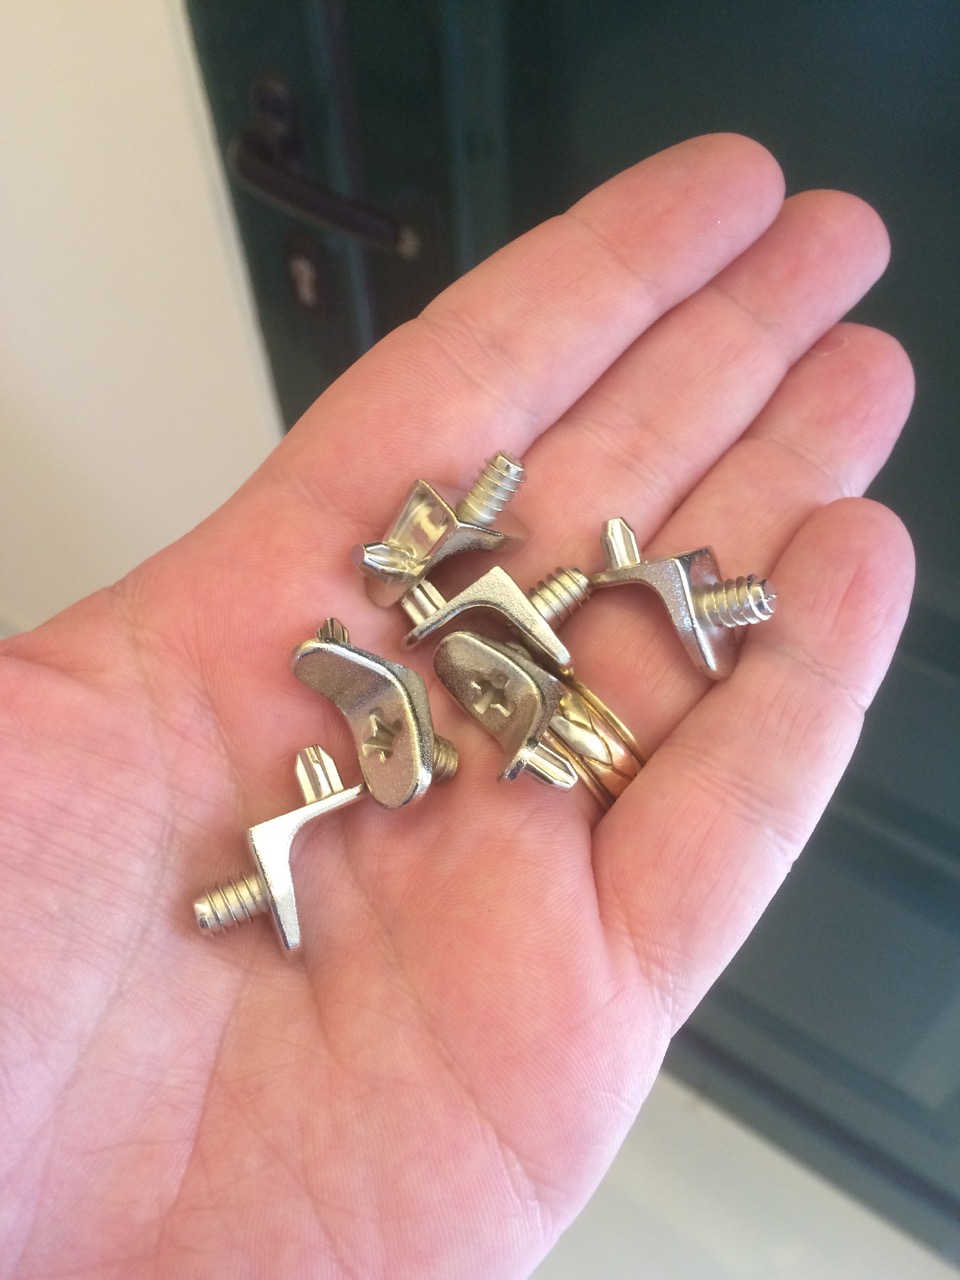
I ordered 6 of these and the guy who made them even painted them in white for me with on his car paint booth, result !
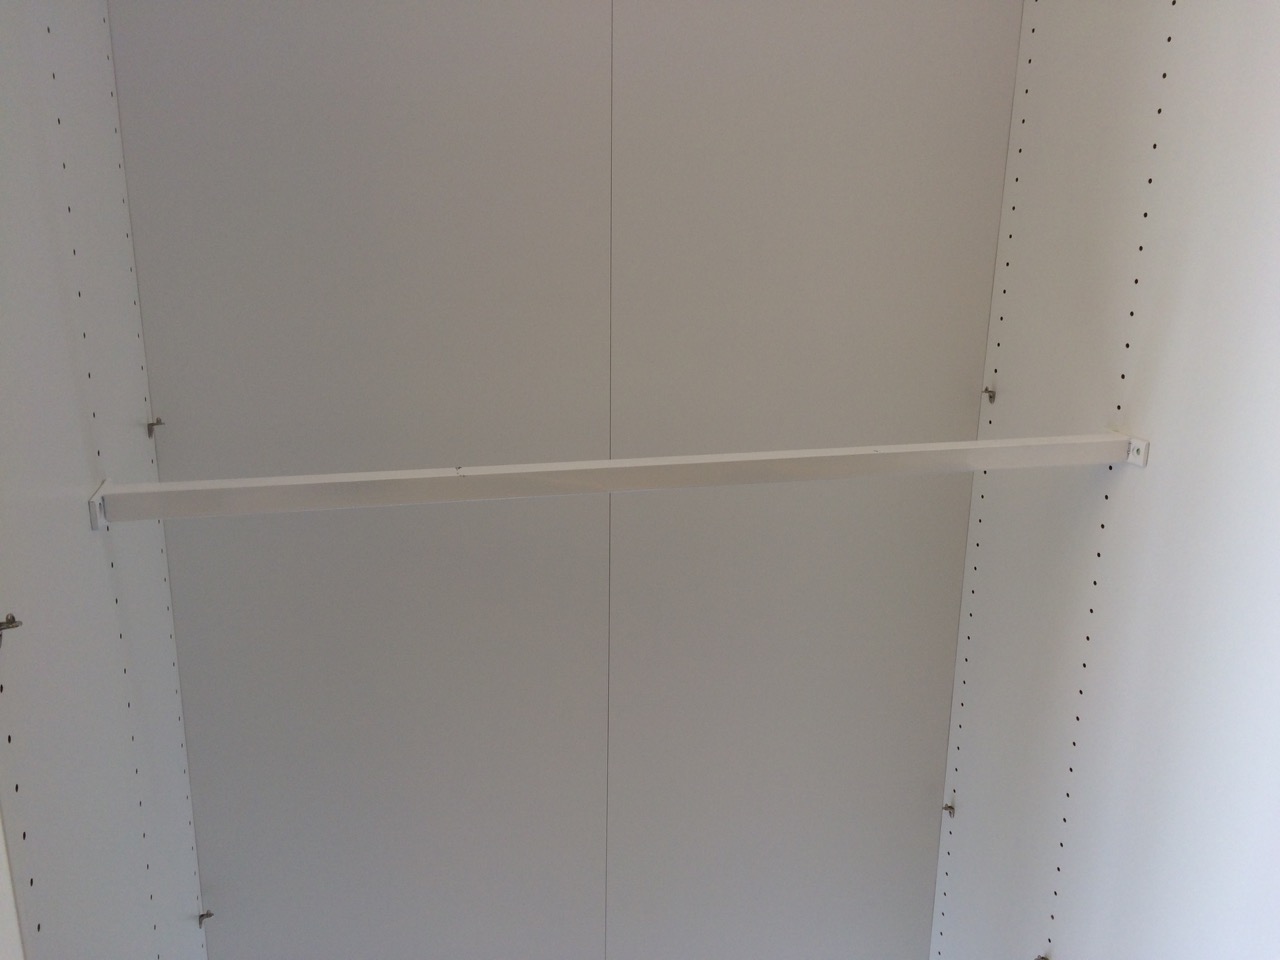
Here is how they look, each side has 2 bolts to attach:
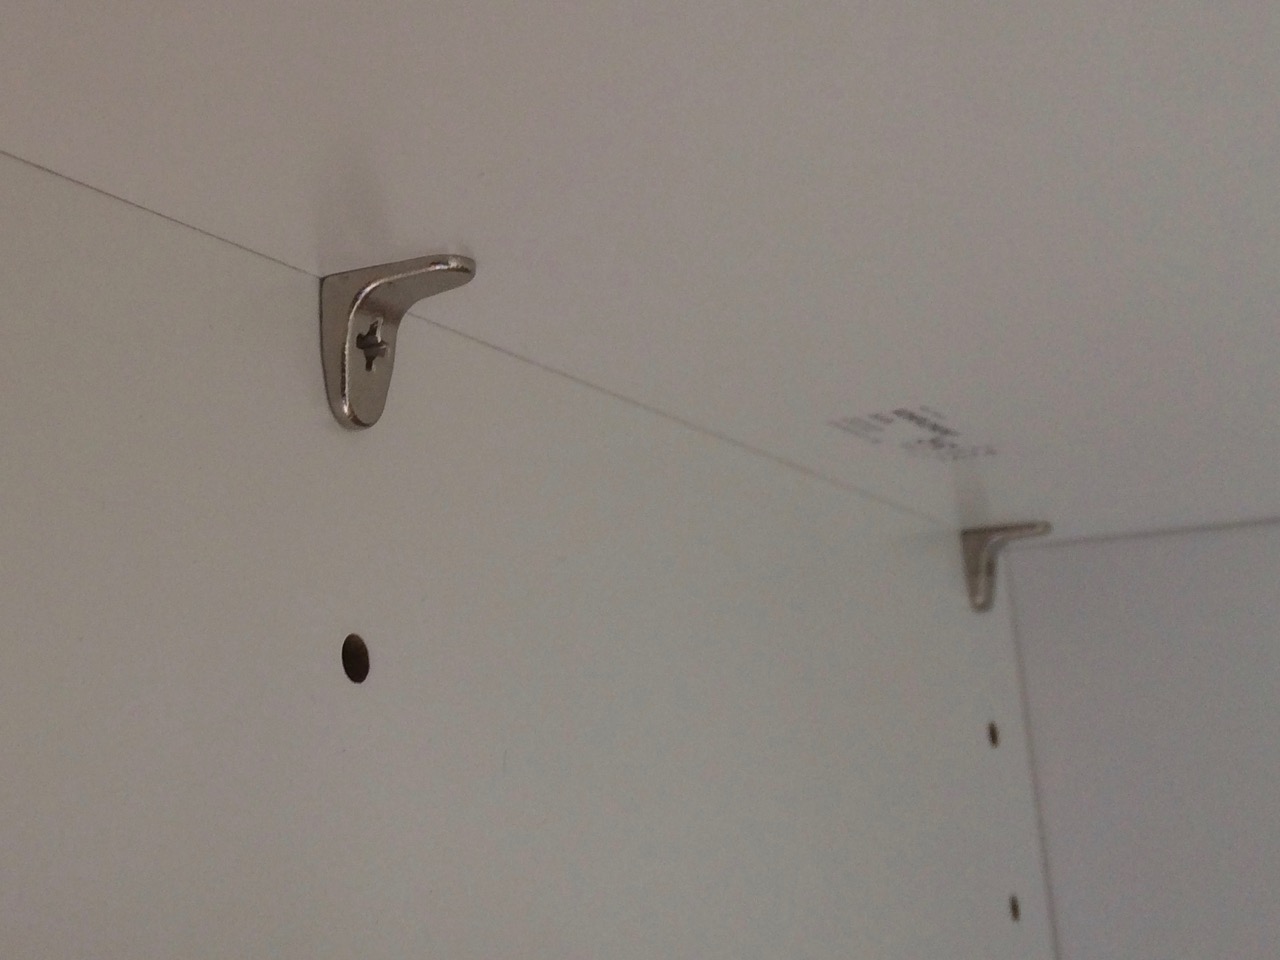
And here is one in place (before attaching), the shelf sits right on top of it and supported by the stronger pegs on the front and back
|

|

|
|
08-22-2016, 01:25 PM
|
#2
|
|
Frackin!
Join Date: Jun 2016
Posts: 41
|
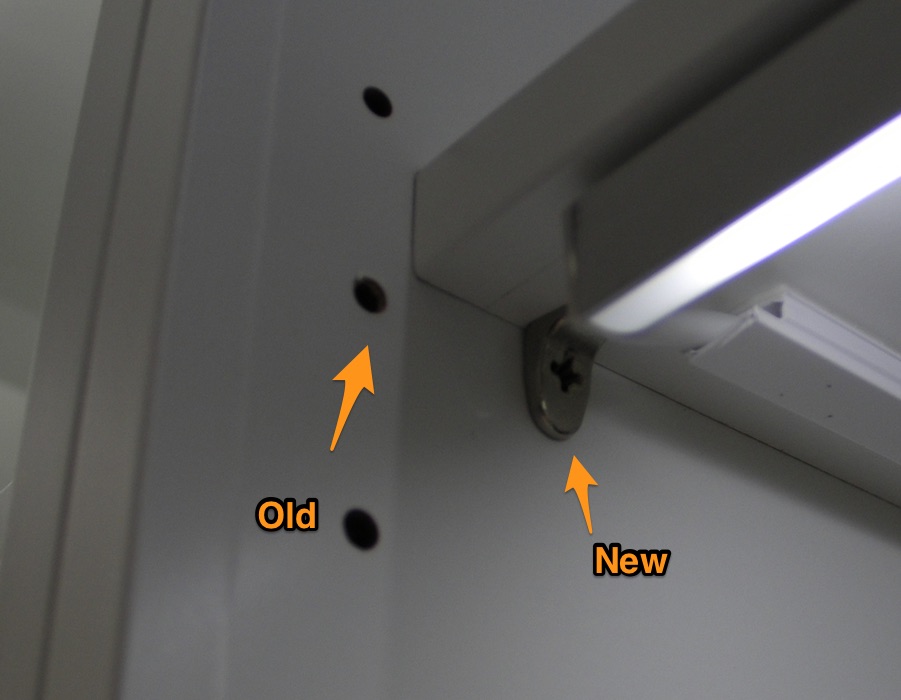
Now, because of the hinges I selected for the acrylic-doors, the shelves themselves had to be cut shorted, I had to remove 3cm from their depth, as such the forward peg had to sit 3cm further in, I just used a 5mm wood drill and was quite an easy job, but be advise if doing something similar, you will have to cut your shelves, also the holes on shelf itself for the back peg wont match up, so you will need to drill there as well with the 5mm drill to make a new hole.
Here you can see the original Ikea hole and the new position I placed the peg .. one also has to take care for one more bit on these PAX systems, the sidewalls of the cabinet are not all solid, they are only solid around the peg holes, so if you try to drill too far from it, you will find the inside to be hollow ... one must be quite careful on this positioning of extra supports.
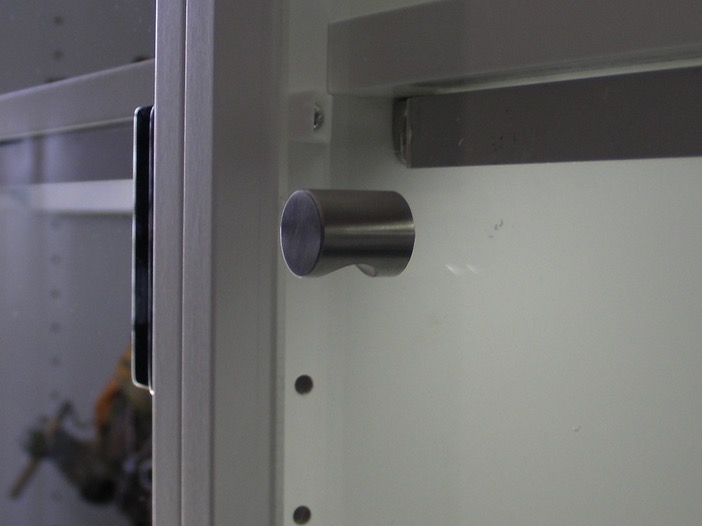
The Acrylic doors are about 220 x 93 cm and 6mm thick, that's some serious weight you have there, to find door hinges that will support it is not easy, I also did not want hinges that would be massive or look tacky, we settled on these heavy-duty glass hinges, 2 might have been enough, but for piece of mind we used 3 per door
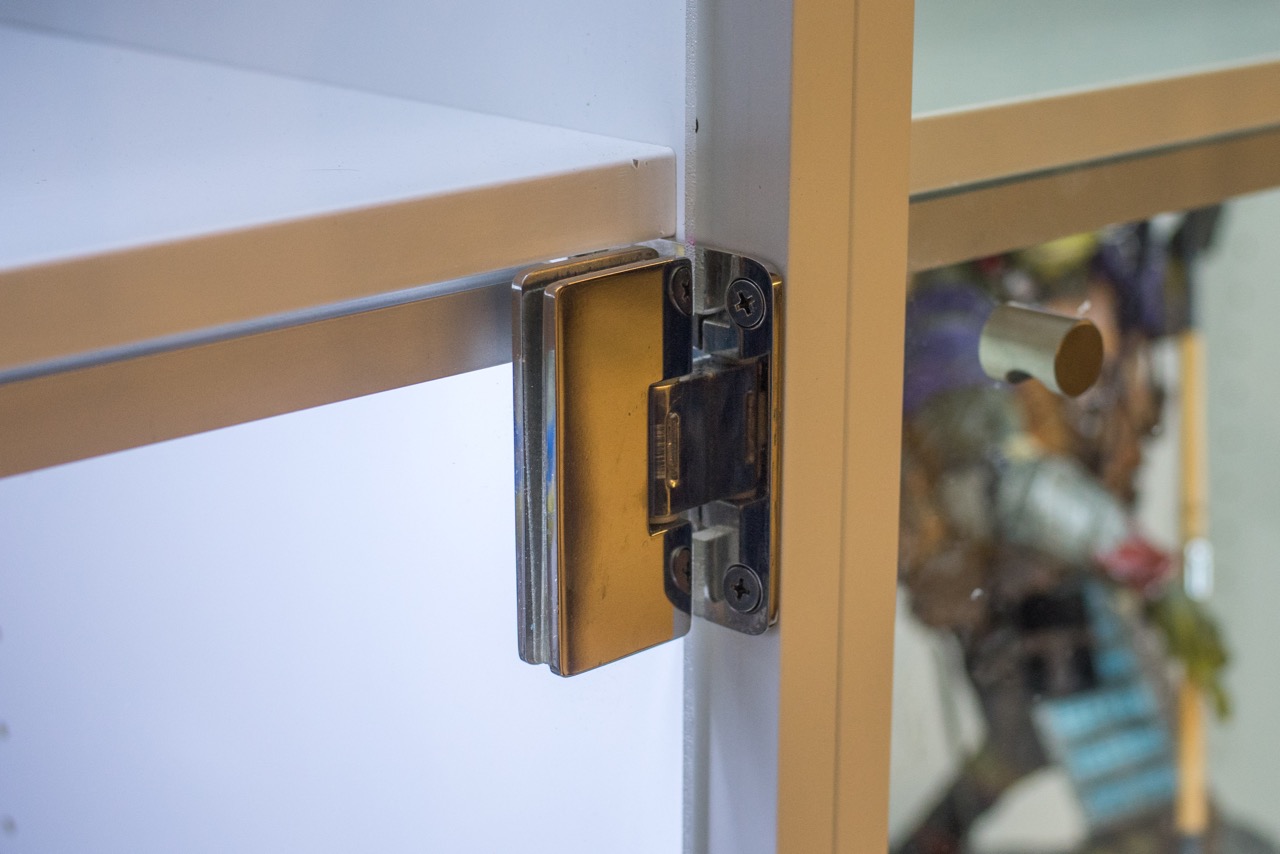
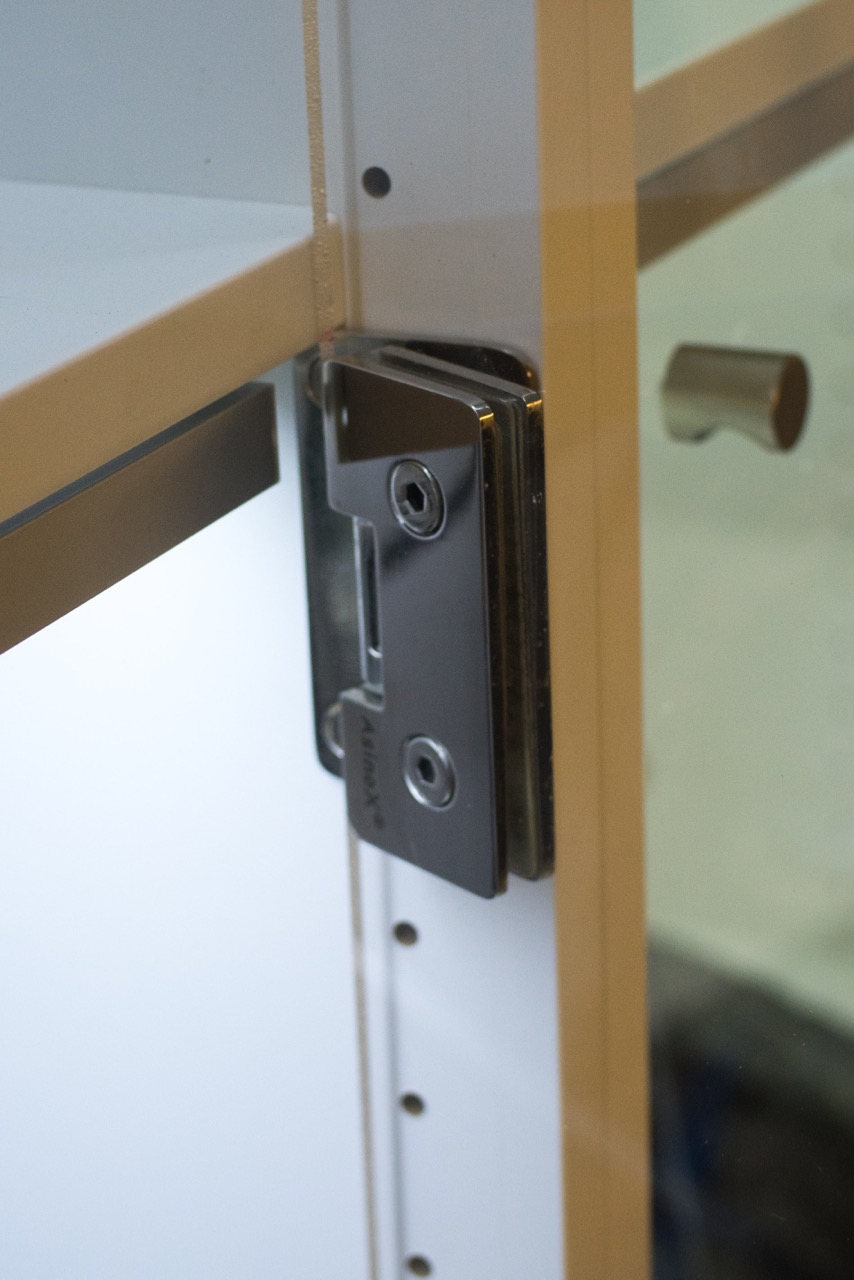
This type of hinges is quite common, any good glass door manufacturer should have it, I loved on mine the fact they have a slot in the hinge that locks the hinge in place and at 45 degrees each way, very useful, but as you see, it does go inside the cabinet a little over 2cm, that's why the shelves had to be cut
For opening the door I used just a simple SS door peg, does the job while not obfuscating the view, you just drill a small hole in the acrylic and you are done
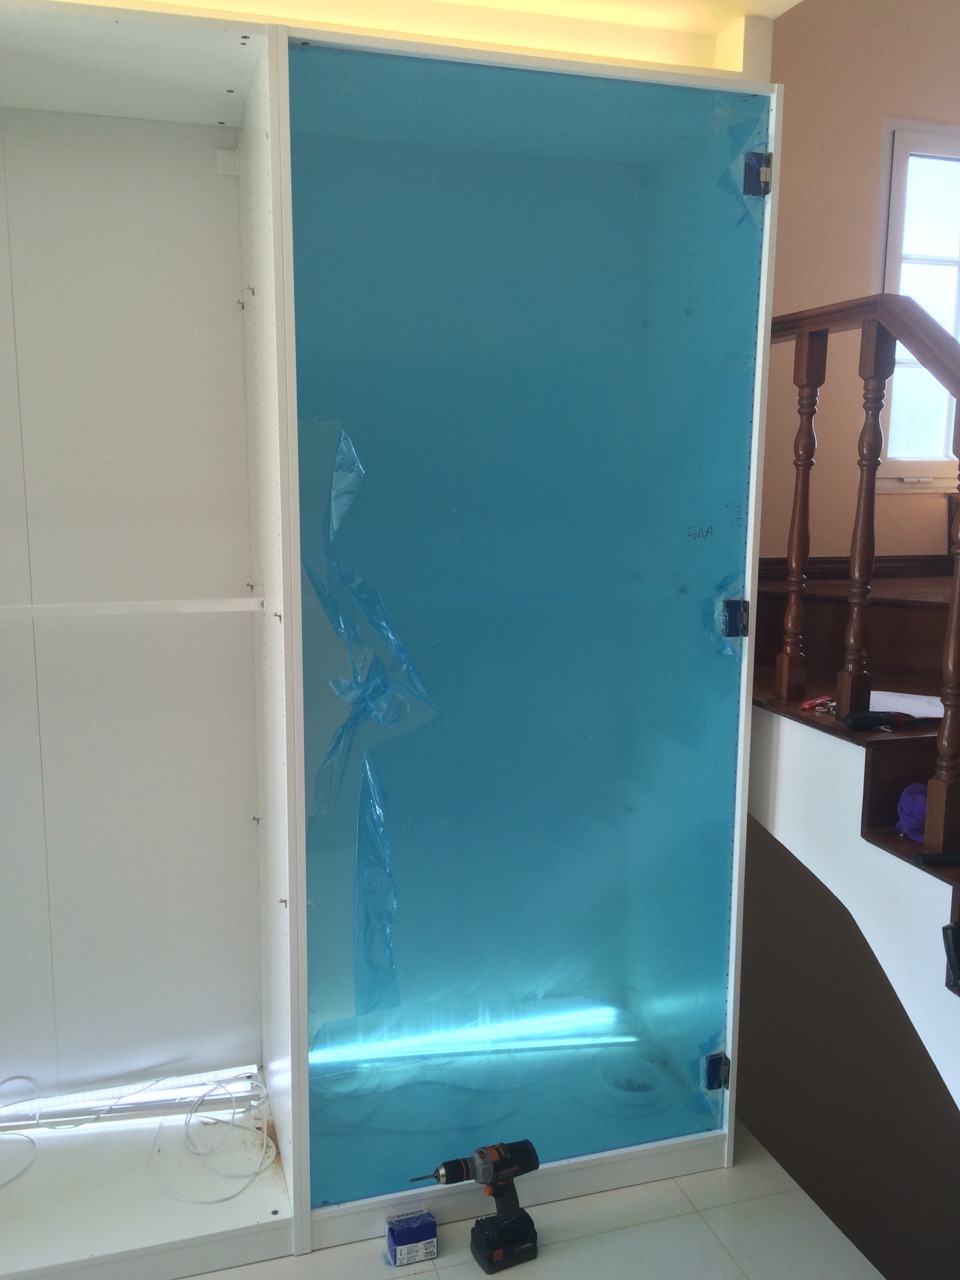
Here is a picture of the first door almost done, still with the blue wrap in the acrylic
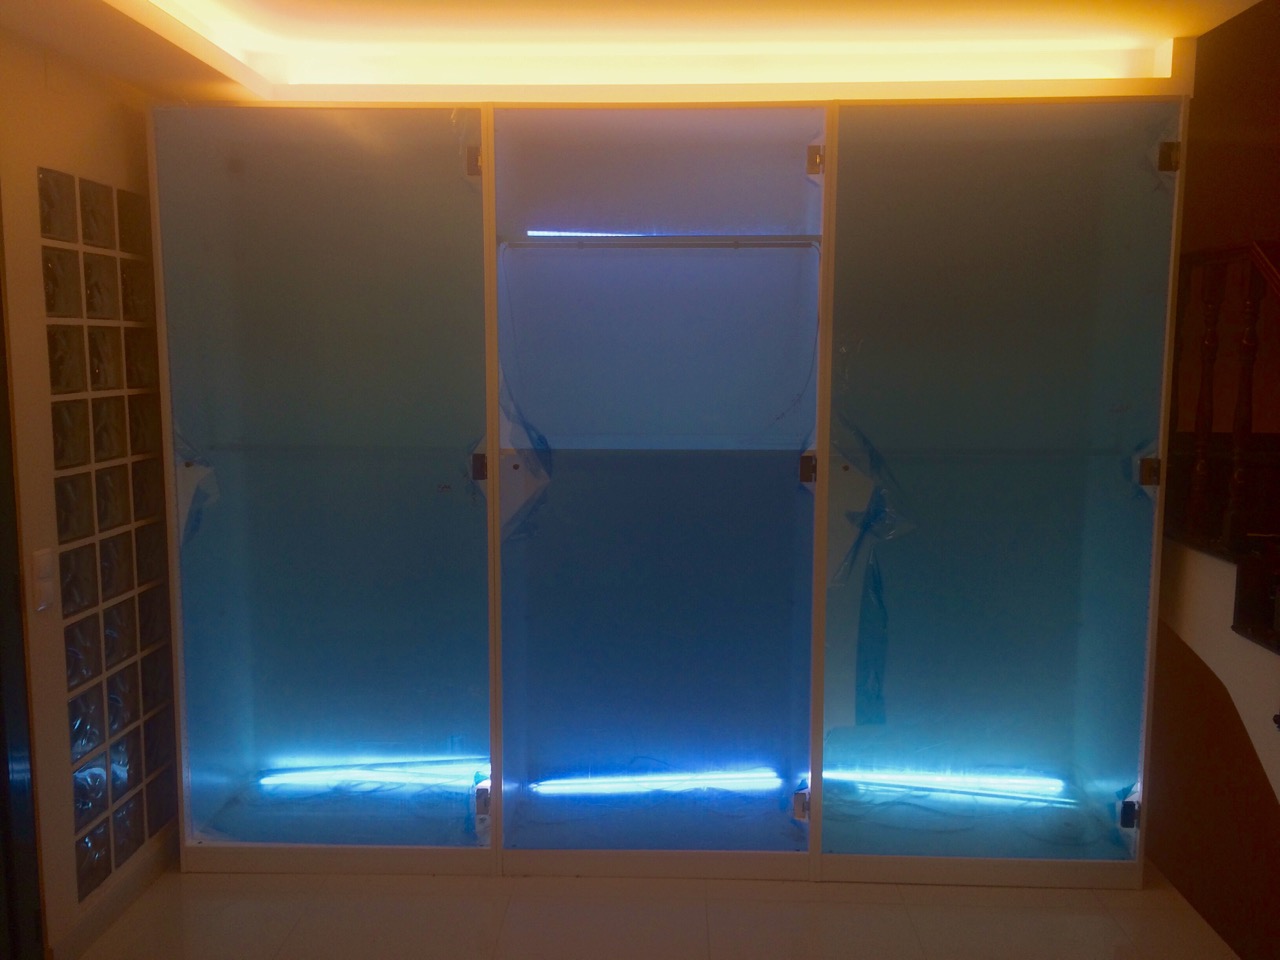
And voila !, all 3 doors done
The acrylic sheet is quite large, and because there is no frame around it, when you open it, you can feel the door is a little floppy (during the open / close movement), not too much- it's not as stiff as it would be if it were glass, this might bother some, it does not bother me as it's minimal, you can see it open here, it holds it shape very nicely
But because it's plastic, when I close it, I noticed the top and bottom on the opposite side of the hinges were not 100% lined up, the top for example would be flush, but the bottom come out 1 cm or so, again this is an easy fix .. get some magnets in there, I plan to attach 3 magnets to it so when I close it the top/bottom and middle snap in with the magnet, like this:
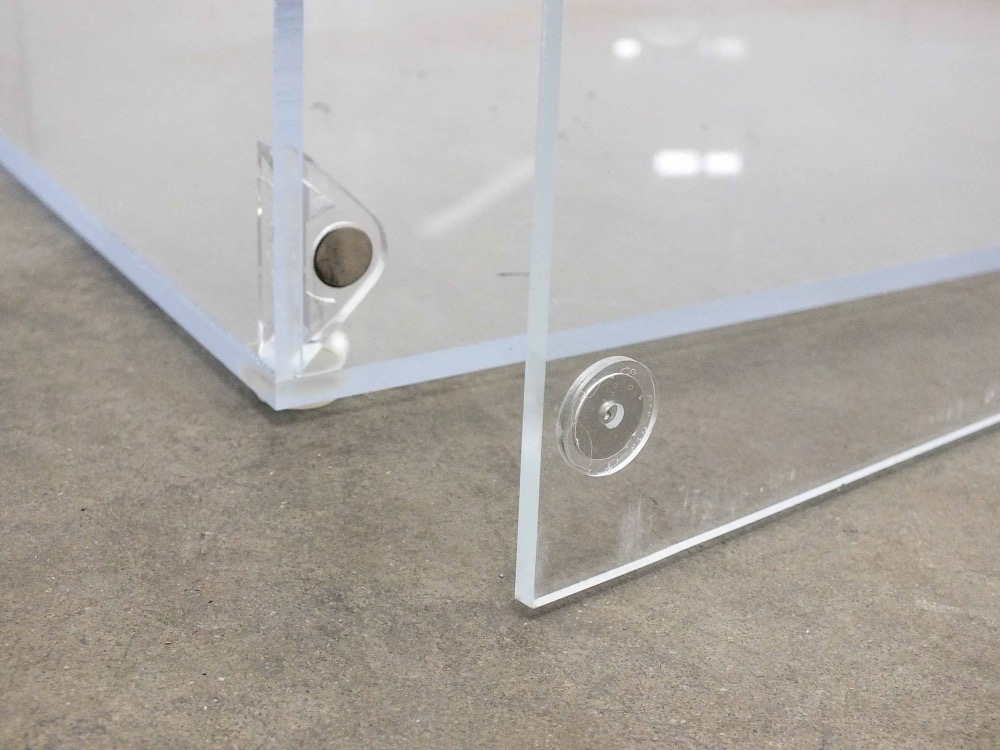
I did not put a lock on it, maybe a lock in the middle will prevent this, but the magnets will do fine for me.
|
|
|
|
|
08-22-2016, 01:26 PM
|
#3
|
|
Frackin!
Join Date: Jun 2016
Posts: 41
|
I did not put a lock on it, maybe a lock in the middle will prevent this, but the magnets will do fine for me.
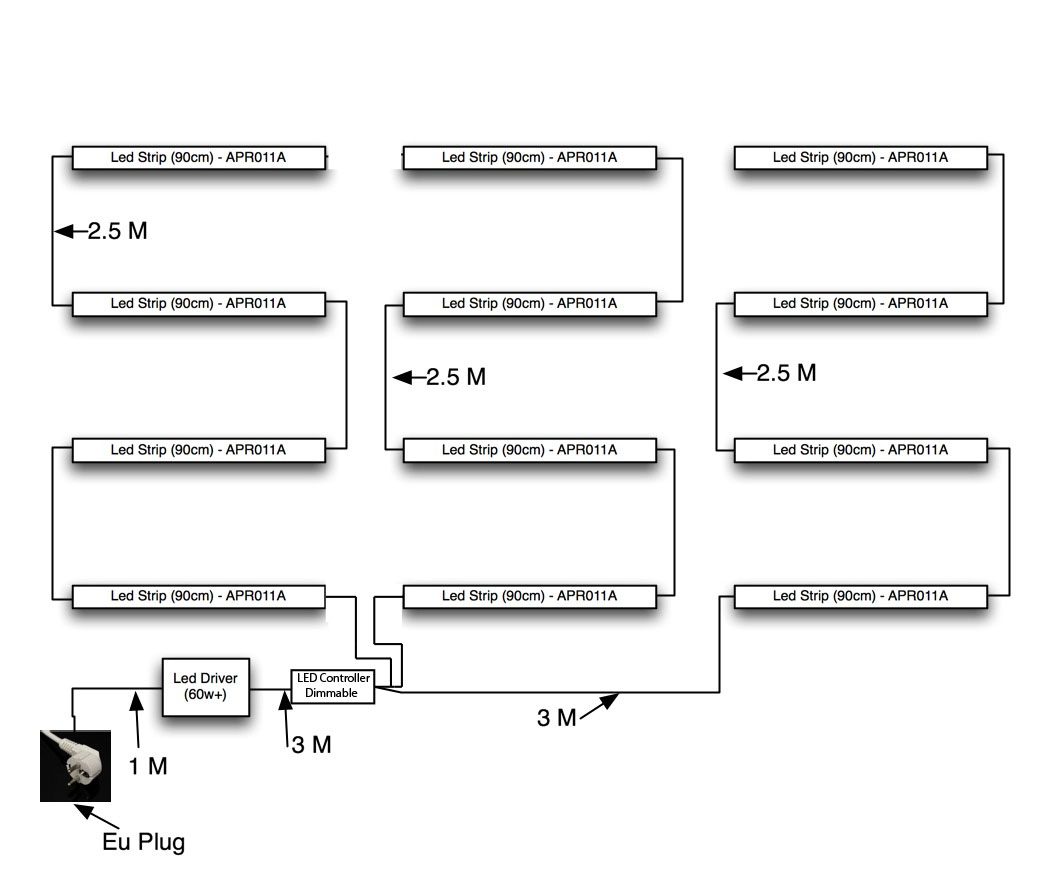
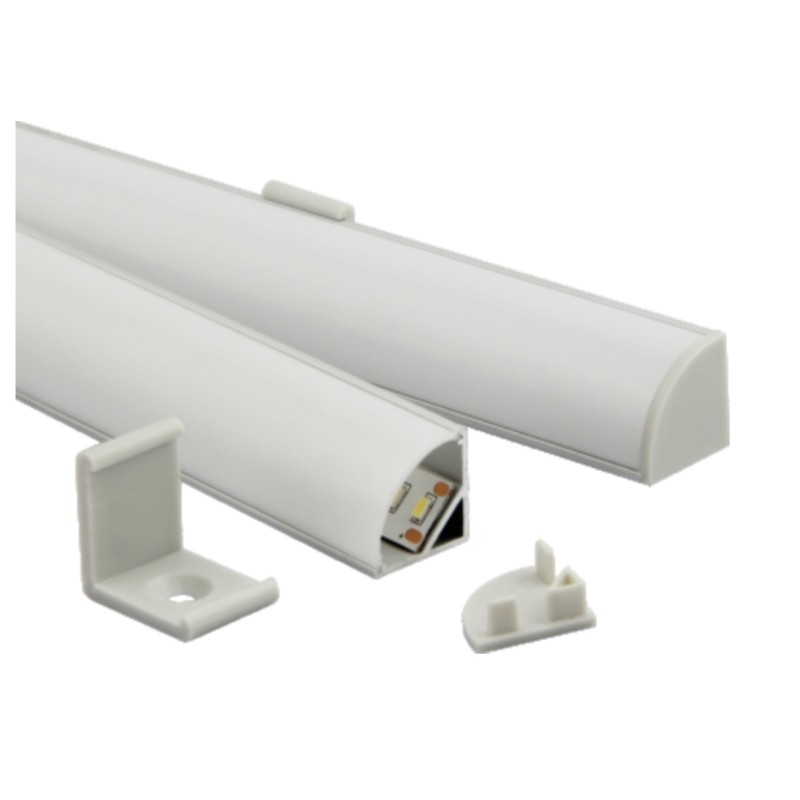
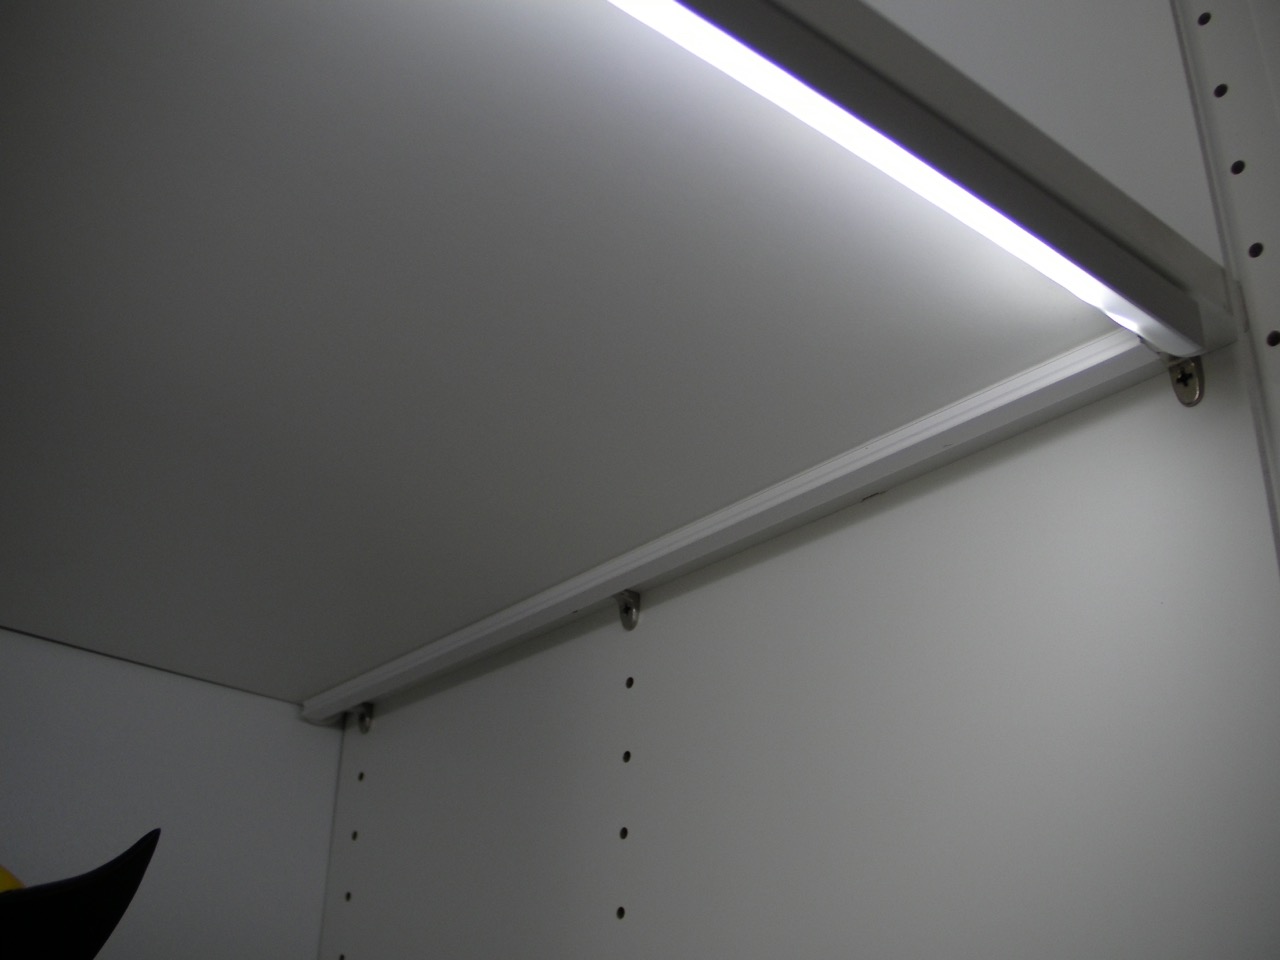
Last but not lease were the lights, I had a company in the UK make them for me, it's s simple aluminium corner profile with a LED strip inside (Pure white, 4200k), I had 12 of them made in 3 strips, all connected to a 60w LED driver like this:
When I had them made, I committed a big mistake, I put the LED controller (on/off) in the wrong spot, so I had to remove it later on, as I went with a different idea for turning them on and off, but first, this is how the profile looks:
And here they are once I installed them
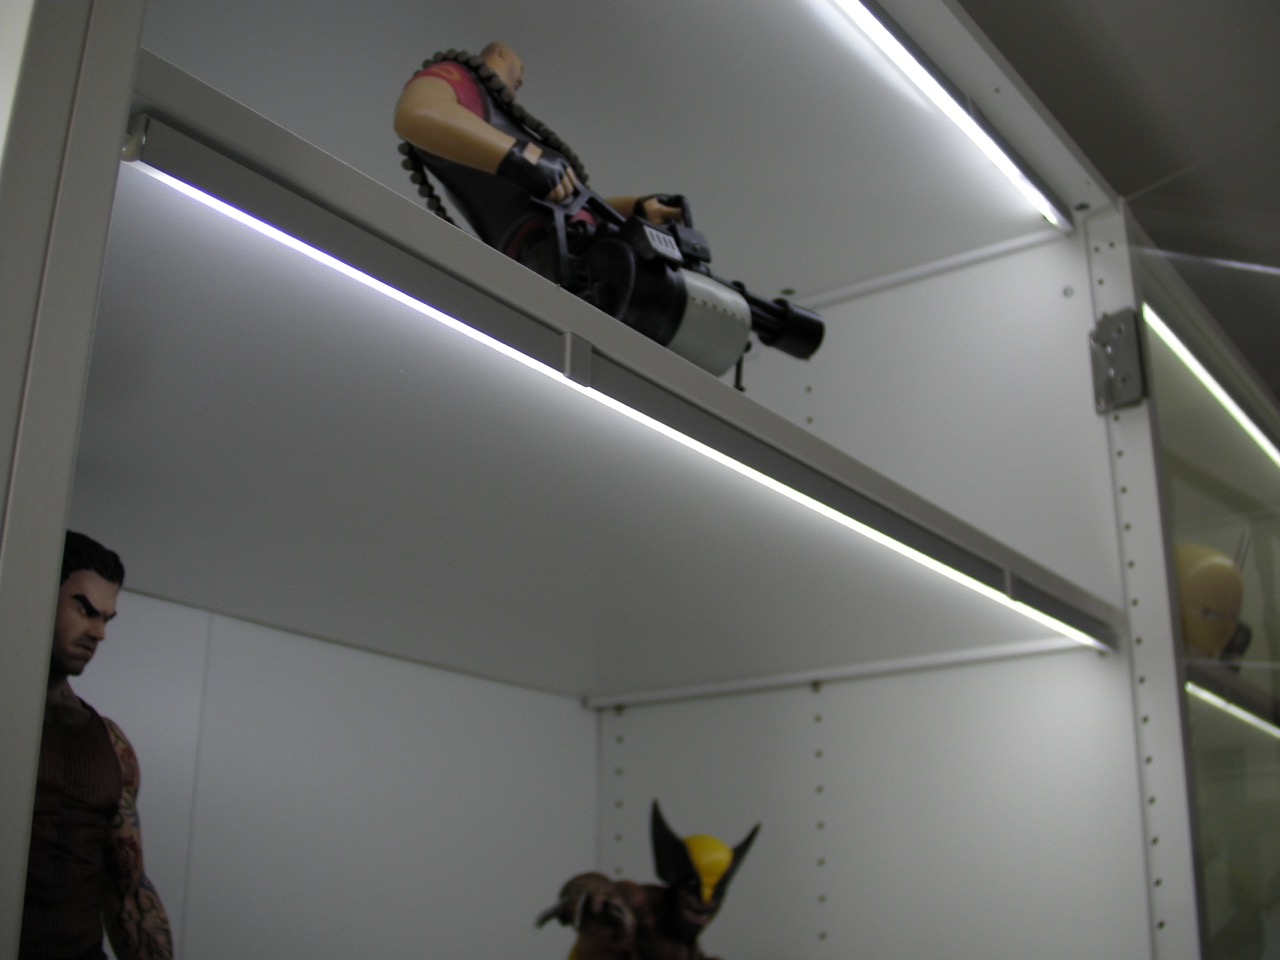

Unfortunately we have a problem with the middle light strip, a small short seems to prevent one of the light channels from working, so the light is blue-ish, we are replacing those soon.
To turn them ON and OFF I used the Belkin Wemo light switch + motion-sensor
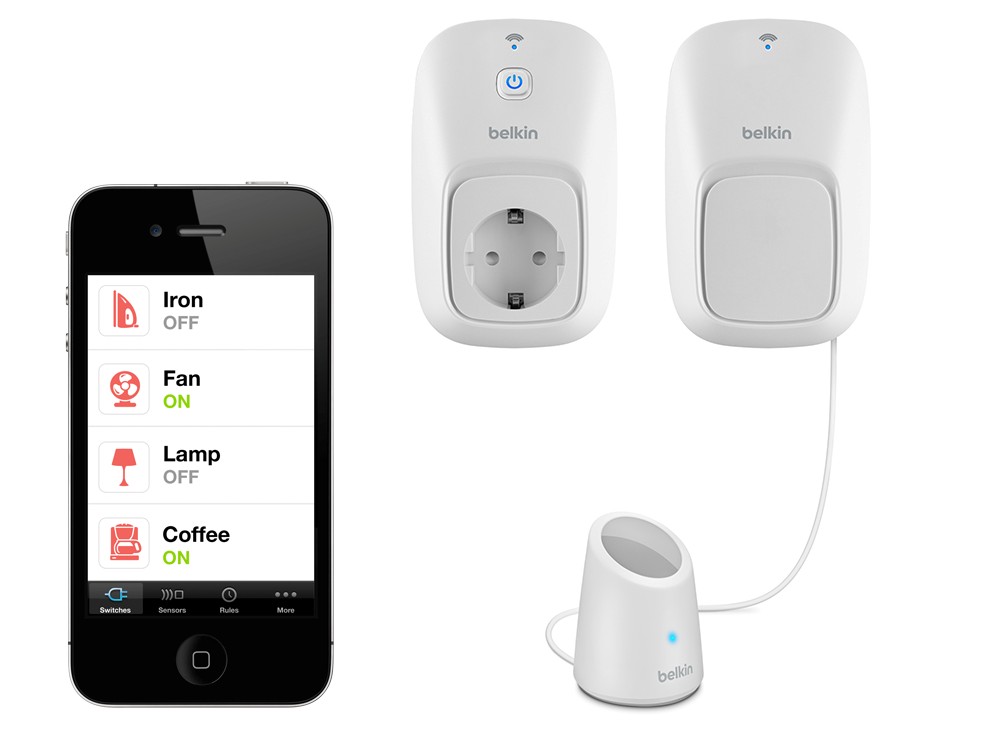
I placed the sensor by the entry door, so when you walk into the house, the lights automatically light up in the cabinets for 15 minutes, gives a great effect, I of course can still control them via the iPhone App, even over the web, so I can turn them on from the phone if I wish to do so.
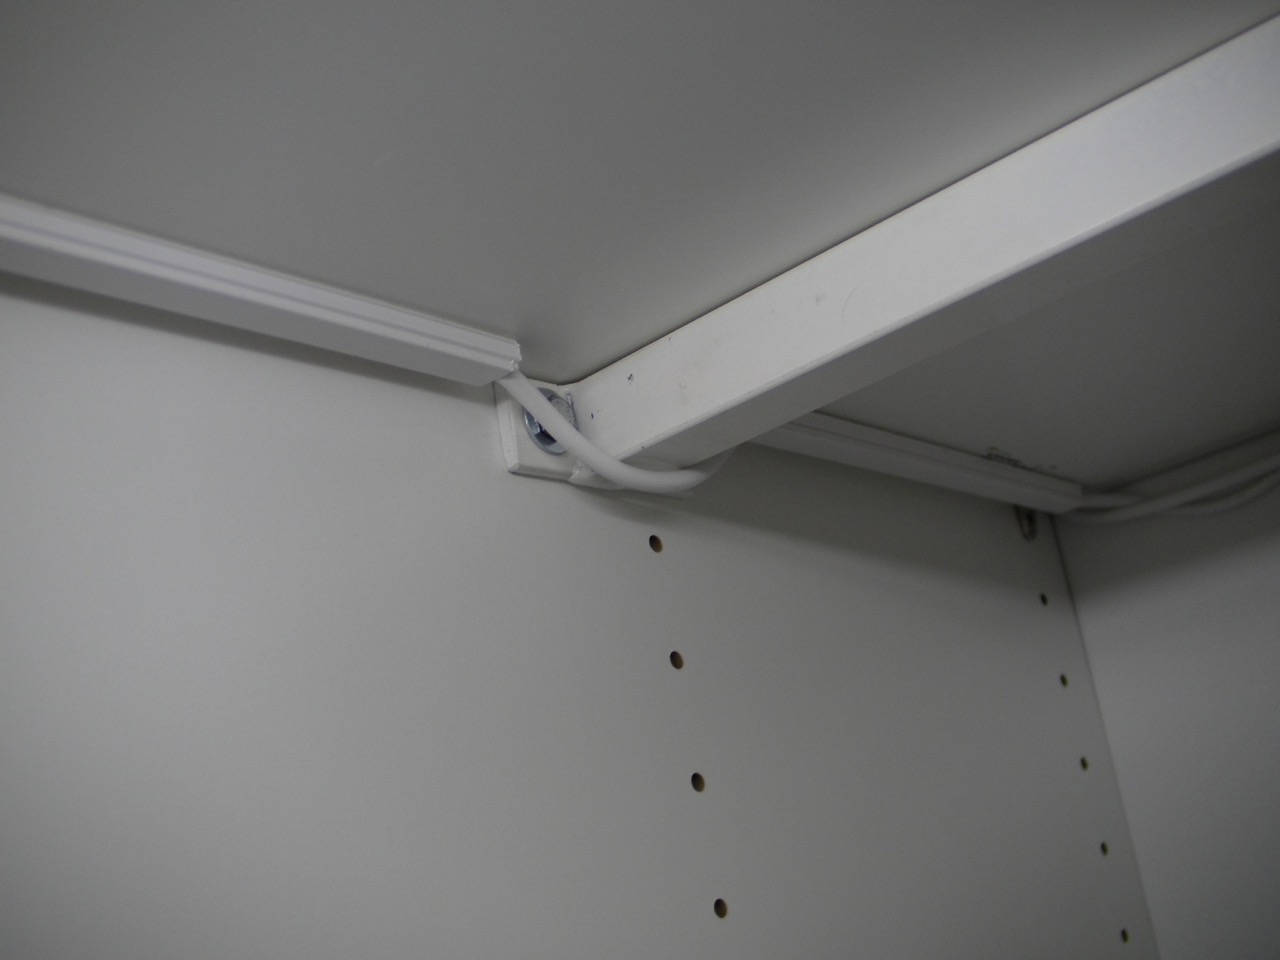
To finish the cabling off, I used a cheap cable profile tube, worked great and make the inside of the cabinets look tidy and neat
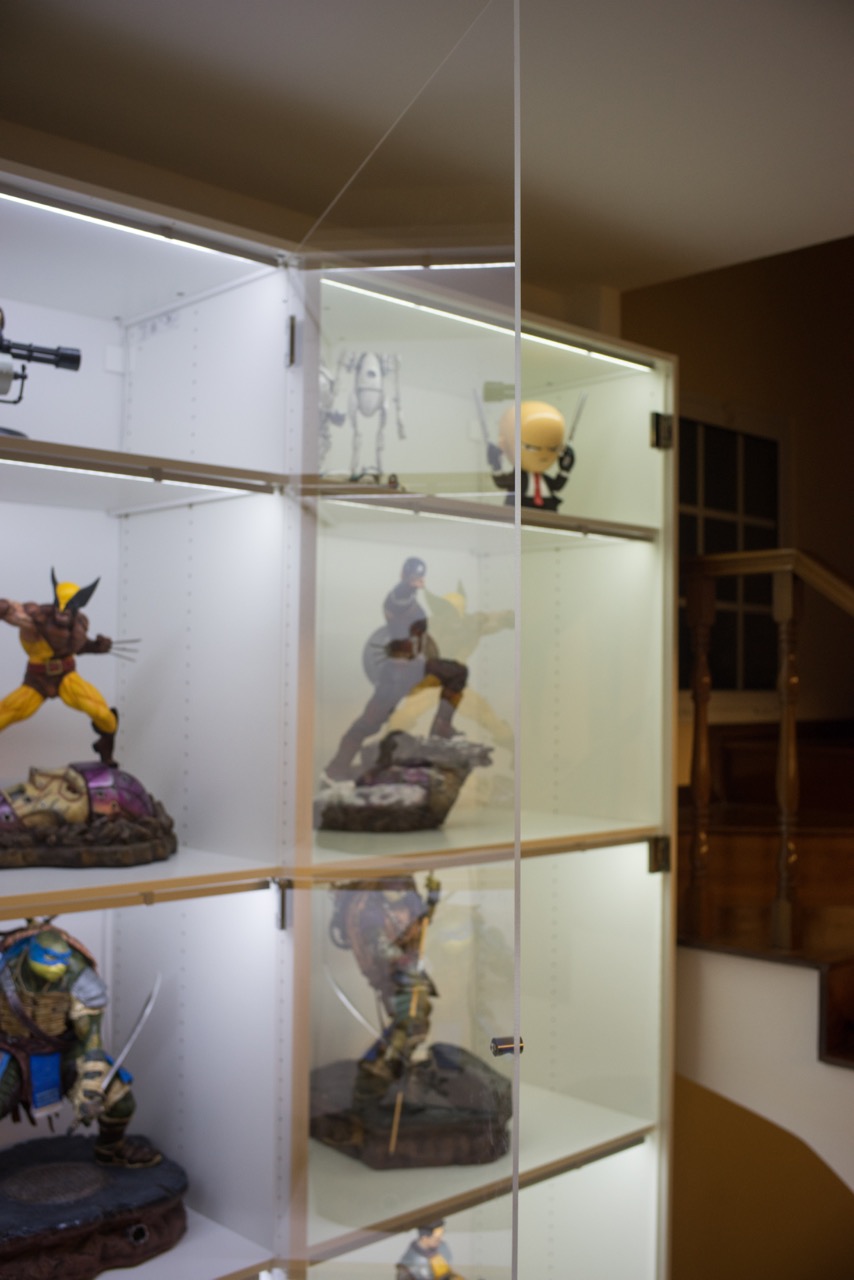
And there you have it, the final assembled cabinet, with the statues, unfortunately with 10 more statues underway, I wont have space for them all, so I need to build a few more cabinets soon

|
|
|
|
|
08-22-2016, 01:33 PM
|
#4
|
|
The InJustice League
Join Date: Jan 2016
Location: Dublin, OH
Posts: 6,155
|
Nice setup!
|
|
|
|
|
08-22-2016, 03:09 PM
|
#5
|
|
Spider-Ham
Join Date: May 2015
Location: Michigan
Posts: 4,020
|
Nice step by step you supplied to your build. The finished product came out great!
|
|
|
|
|
08-22-2016, 05:29 PM
|
#6
|
|
Frackin!
Join Date: Jun 2016
Posts: 41
|
Thanks guys, I think this is as good as you get for a statue display cabinet, only thing now is I am toying with the idea of adding a mirror back, but undecided still
|
|
|
|
|
09-08-2016, 10:56 AM
|
#7
|
|
Look out for #1. Don't step in #2 either.
Join Date: Aug 2015
Posts: 1,202
|
Great looking custom cabinets ! Thanks for sharing your build.
|
|
|
|
|
09-09-2016, 02:36 PM
|
#8
|
|
Gen 13
Join Date: Feb 2011
Location: Where the Sun doesn't shine
Posts: 9,586
|
Well done with the display unit.
|
|
|
|
|
09-09-2016, 03:21 PM
|
#9
|
|
The Thunderbolts
Join Date: May 2010
Location: In a World of my own.
Posts: 5,188
|
Love the Narin Wolverine. Saw it on another site and thought it was cool take on the character.
|
|
|
|
|
10-03-2016, 05:59 PM
|
#10
|
|
Frackin!
Join Date: Aug 2011
Posts: 33
|
Great looking display.
|
|
|
|
|
|
 Posting Rules
|
You may not post new threads
You may not post replies
You may not post attachments
You may not edit your posts
HTML code is Off
|
|
|
|
All times are GMT -4. The time now is 07:59 AM.
|


